Hello, a few weeks ago I started working on a time tracker project. And one of the vital components was an MPU-6050 gyroscope, I needed a tutorial to get the x y z values. And I found many tutorials on it. But whenever I tried them I had a lot of problems noticeably with drift. The drift means that the readings were not stable at all. After 30 seconds some values had quadrupled even though the card itself was still. So I found a lot of answers that told me “yeah this is a common problem”. But not really any help in solving it. So here’s a full MPU60-50 tutorial from start to finish that I wish I had when I wanted to use it.
Wiring
The wiring is pretty straightforward :
- VCC to the 5V pin
- GND to ground
- SCL to the A4 pin
- SDA to the A5 pin
- INT to the 2 pin
The other pins are not useful for the most of the use cases. If you are interested nonetheless or want to know more about this chip I encourage you to read the documentation here : https://www.invensense.com/products/motion-tracking/6-axis/mpu-6050/

Reading the x y z values
Now that the wiring is done, it’s time to move onto the actual software. In order to get the x y z values we need to be able to read the raw values, there are a ton of tutorials on how to do that. But ultimately it’s not that useful as you need to make calculations on it for these values to really have meaning. After digging quite a while and trying out various tutorial like this one I realized that, while it’s quite interesting to make everything from scratch, when you want to build things quickly, it’s often better to use a library from someone who’s spent much more time than you on the problem.
Also none of those tutorials seemed to handle the part where you’re supposed to calculate offsets and calibrate the damn thing. And if you don’t calibrate it, you most likely will run into problems sooner or later.
The MPU6050 tockn library
Github user tockn created this awesome library called MPU6050_tockn (leave him a star if you can). Which does pretty much everything for you. Better yet, it’s available on the arduino library manager. So it’s extra easy to download it.

Go ahead and download the library (I’m using 1.5.2). And now load up this code :
#include <MPU6050_tockn.h>
#include <Wire.h>

MPU6050 mpu6050(Wire);

void setup() {
  Serial.begin(9600);
  Wire.begin();
  mpu6050.begin();
  mpu6050.calcGyroOffsets(true);
}

void loop() {
  mpu6050.update();
  Serial.print("angleX : ");
  Serial.print(mpu6050.getAngleX());
  Serial.print("\tangleY : ");
  Serial.print(mpu6050.getAngleY());
  Serial.print("\tangleZ : ");
  Serial.println(mpu6050.getAngleZ());
}
After a few seconds of loading you should get this :
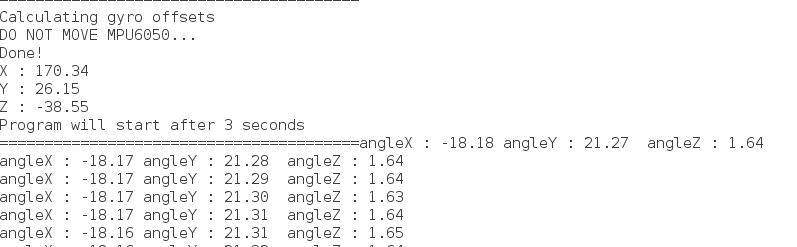
Success ! Keep in mind that you might still encounter drift issues especially on the z parameter. Also once your offsets are calculated, use mpu6050.setGyroOffsets(x, y, z); rather than calculating them each time. It’ll allow for a faster startup and less chances of you messing up the offset calculations by unintentionally moving it.
And that’s it for this tutorial on how to get x y z values on the MPU-6050. Feel free to leave a comment if you have any questions. And if you want to dig deeper, there is another example with more data from all the elements on the board (accelerometer/gyroscope and temperature) here.